Stencils for Home Decor: Versatile & Reusable Design Ideas
Interior design stencils in history
Interior design stencils in history
Stencil patterns first became popular for use in interior design during the first half of the 19th century, where stencilling techniques were often used to mimic wallpaper designs, and decorate ceilings and floors. Examples of the technique can be seen in many historic and iconic buildings today. The All Saints Church in Maidstone is a lovely example of the intricacy that can be achieved with the use of layered stencils. Repetitive stencils were also extensively used to decorate Turkish Baths, for example the Harrogate Turkish Baths.
Whilst the mediums and materials have changed throughout the years, the principle technique has remained the same. Extensively used today in the restoration of historic interiors, to recreate damaged or worn decorative detail. Stencils can be precisely designed to restore sections to allow for seamless restoration.
While restoration is still a popular use for stencils, stencilling for interior design has become back in fashion for the first time since Laurence Llewelyn-bowen showcased this on changing rooms back in the 1990's.
There a few reasons why this technique is making a comeback, first and foremost, cost. Decorating your home to your taste can be expensive. From wallpaper, tiles and floors, to the special shade of paint from Farrow & Ball, materials alone don’t come cheap. This is where stencils are a DIY’ers slice of heaven.
tencils have many uses in the home and one stencil can be reused indefinitely as long as its cleaned and cared for properly. They can be used on walls, floors & tiles as long as they are applied correctly.
Stencils for the home are usually used in two different formats – a repeated pattern or a design or logo.
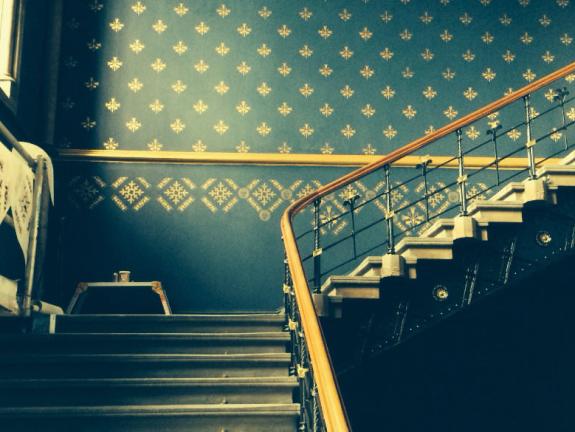
In the grand staircase example above two different designs were used for a repeated pattern, which gives the illusion to look like wallpaper. While this method is certainly time consuming it allows for an unlimited design to be created, freedom of where and how the pattern is repeated and indeed personalisation of the design itself, when you directly buy from a producer like ourselves.
This Manchester United logo featured in a fans bedroom, is an example of a stencilled design used on a wall. Easy to apply, this method has more style and longevity than a poster.

Stencilling old wooden or concrete floors can be a great way of giving new life to a slightly worn surface. A faux tile pattern is a very popular choice for a bathroom or kitchen, and these tile patterns can also be used on actual tiles for a more authentic look.

In this grand example two different designs were used for a repeated pattern, which gives the illusion to look like wallpaper. While this method is certainly time consuming it allows for an unlimited design to be created, freedom of where and how the pattern is repeated and indeed personalisation of the design itself, when you directly buy from a producer like ourselves. With both stencilling walls & floors, the key to your design lasting the distance is preparation.

For a more comprehensive guide to stencilling see our blog on the 10 steps of essentials!
We hope we have inspired you to give stencilling a try in your home!
Email [email protected].
Call 0161 989 0847.